I needed new coasters. For guests, ya know? We had these amazing cork trivets from IKEA, but the kids sort of took to throwing them around like frisbees and/or taking bites out of them. So my requirements for new coasters included:
- Doesn’t break or break other things when thrown
- Doesn’t show bite marks
- Protects table from liquids and heat, like a good coaster should
I went to the Sally Ann to look for some, but all were either made from stoneware or glass. No good options there. Googling the inter-ma-net gave me the inspiration I needed to make some of my own. And since I had just recently sorted all my fabric scraps by color, I knew I had a few different denims to choose from. Some of this denim came from old jeans that I had previously mended with sashiko stitching. I saw another blog that used sashiko stitching to create boro-inspired coasters. Please read more about this Japanese practice of mending to understand it more fully. Many of the pieces of denim in the coasters I made are out of fresh scraps, but some of the blue denim is from the already mended knees of my old jeans. Oh how cool.
If you want to follow along:
- Find your denim and cut FOUR 5×5 inch squares. These will be your background pieces. Cut any color. I cut two white, one black and one was the previously mended blue denim knee (see background denim on the image at step 6.
- Cut FOUR 5×5 inch squares of batting. I used white felt fabric from the dollarama that I had on hand.
- Cut FOUR 5×5 inch squares of bottom fabric. I used scrap linen blend in a cream color.
- Cut out a few different sized rectangles and squares to place on top of your background denim. Some can be contrasting colors or the same color.
- Layer the batting on the bottom, then background denim, then one rectangle or square. Using a thick thread (topstitching thread or embroidery floss) stitch using a running-stitch, up and down, the rectangle to “patch” your background piece.
- Take another rectangle or square and layer it or place it anywhere on your background denim, and stitch it down using the same running stitch. Sometimes I used a plain running-stitch. Other times, I crossed this stitch with another perpendicular line of running-stitches.
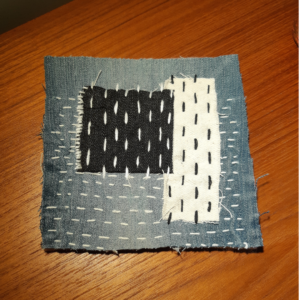
The above photo is the batting underneath previously stitched blue denim. I stitched the white denim on top of that using black embroidery floss. Then I layered the black denim using white embroidery floss. The raw edge on the left hand side of the black piece was a bit wide for my liking, so I stitched it down all along the edge.
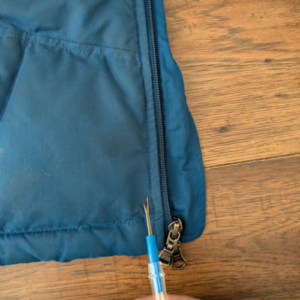
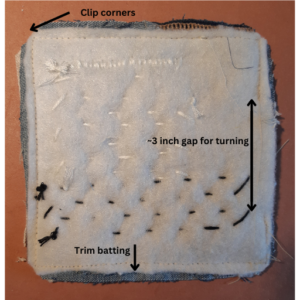
7. Once happy with the coaster top, place it right sides together with your bottom fabric (mine was linen blend). Take it to the sewing machine and stitch around the edge using 1/4 inch seam allowance, backstitch at beginning and end. Leave a gap on one edge 3 inches long so that you can turn it right side out later. Alternatively you can sew this by hand.
8. Cut across all the corners and trim batting back by ~1/8 inch to help your seam lie flatter when right side out.
9. Turn it right side out! Gently push out the corners, not pushing too hard to distort them. I like to use a point turning tool or a chopstick.
10. Give them all a good press with the iron.
11. Hand-stitch the gap closed using a ladder stitch.
12. Now go! Make yourself a cup of coffee and enjoy your finished work!
Don’t mind the heavy hand on the caramel drizzle or the crazy foam. I’m breaking in my espresso machine and the foam I get is mighty frothy 😉
Happy sewing!